Lesson 1
- maiguzman28
- Apr 26, 2020
- 6 min read
Updated: Jul 16, 2020
So this is what I learned from the first chapter of the Book Learning Processing.
One Step at a time:

Processing is an open source programming language and environment for people who want to program images, animation, and sound. It is used by students, artists, designers, architects, researchers, and hobbyists for learning, prototyping, and production. It is created to teach the fundamentals of computer programming within a visual context and to serve as a software sketchbook and professional production tool. Processing is developed by artists and designers as an alternative to proprietary software tools in the same domain.
Writing software, programming, and creating code is no different. It’s really easy to forget this since the work itself is so inherently tied to the computer. But you must find time to let your mind wander, think about logic, and brainstorm ideas away from the chair, the desk, and the computer. Personally, I do all my best programming while jogging.
What I learned: To not be scared of programming. I remembered how precise you have to be while programming, and I used to spend a while searching for an error. But then there was the moment of success that comes when you finally find your mistake, fix it and the everything works the war it its supposed to.
Divide and conquer: It is important to think in pieces, not to think about programming everything at the same time.
Algorithms: When all is said and done, computer programming is all about writing algorithms. An algorithm is a sequential list of instructions that solves a particular problem. And the philosophy of incremental development (which is essentially an algorithm for you, the human being, to follow) is designed to make it easier for you to write an algorithm that implements your idea.
Chapter 1
Each pixel of the screen is a coordinate—two numbers, an “x” (horizontal) and a “y” (vertical)
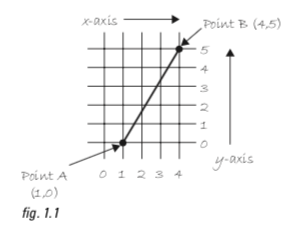
So in order to write the code to describe that line, we have to write it in () and with numbers. It would be this: line(1,0,4,5);
1.2 Simple Shapes In Processing, a rectangle is specified by the coordinate for the top left corner of the rectangle, as well as its width and height. A second way to draw a rectangle involves specifying the centerpoint, along with widthand height. If we prefer this method, we first indicate that we want to use the “CENTER” mode before the instruction for the rectangle itself. Note that Processing is case-sensitive. Finally, we can also draw a rectangle with two points (the top left corner and the bottom right corner). The mode here is “CORNERS”. Personally, I think this is the clearest way to determine a rectangle.
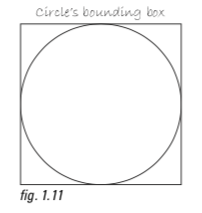
A bounding box of a shape in computer graphics is the smallest rectangle that includes all the pixels of that shape. For example, the bounding box of a circle is shown in Figure 1.11. The default mode for ellipse( ) is “CENTER”, rather than “CORNER” as with rect( )
So this was me playing for the first time with Processing:

1.3 Grayscale Color
By adding the stroke( ) and fill( ) functions before the shape is drawn, we can set the color.
stroke( ) or fill( ) can be eliminated with the noStroke( ) or noFill( ) functions.

So after many try and errors I was able to solve the following Exercise:

1.4 RGB Color

1.5 Color Transparency
It is important to realize that pixels are not literally transparent, this is simply a convenient illusion that is accomplished by blending colors. Behind the scenes, Processing takes the color numbers and adds a percentage of one to a percentage of another, creating the optical perception of blending Alpha values also range from 0 to 255, with 0 being completely transparent (i.e., 0% opaque) and 255 completely opaque (i.e., 100% opaque) 1.6 Custom Color Tanges Processing will let us think about color any way we like, and translate our values into numbers the computer understands. For example, you might prefer to think of color as ranging from 0 to 100 (like a percentage). You can do this by specifying a custom colorMode( ).
Chapter 2
It was very important to get acquintence with the program, so I found it very helpful to find a screenshot on the book of where is what.

Since the project will get inevatible very long, It is important to work with comments. You should get in the habit right now of writing comments in your code. And here is how you should write them:

Errors: If multiple errors occur, Processing will only alert you to the first one it finds (and presumably, once that error is corrected, the next error will be displayed at run time). Our life is made simpler by only having to look at one error at a time, nevertheless we do not have access to a complete error list.
The Processing Reference
You can find a lot of help on the website. It explains how you have to write the codes and how why. This is very helpful for someone like me, with pretty much zero knowledge of programming.

So after reading the second chapter I thought I was ready to try and draw the corona virus.
It was pretty much a try and error. I have very big difficulties with the position and the visualization of where the elements go on the canvas. So I started to draw a lot of colored circles to simulate the arms of the corona virus.

I just copy and paste them and move them around to define the right position.

Chapter 3
So I had a little sense of accomplishment when I drew the corona virus. But when I started the third chapter, it got very confusing to me. As described in the book:
Step 1. Set starting conditions for the program one time. Step 2. Do something over and over and over and over (and over … ) again until the program quits.
Exercise 3-1: In English, write out the “ flow ” for a simple computer game, such as Pong. If you are not familiar with Pong, visit: http://en.wikipedia.org/wiki/Pong .
This to me is a action-reaction game. The ball moves from one side to the other back and forth. So it reacts to the movement in a similar movement.
I was still very confused...
Unlike Chapter 2’s static examples, this program will draw to the screen continuously (i.e., until the user quits). This is accomplished by writing two “ blocks of code ” setup( ) and draw( ) .
I found the block of code very useful. To me its just a big big screen full of numbers, so I am very grateful to have a clear structure.

As I was again frustrated... I read the most important sentence of the chapter:
For now, we have to decide to feel comfortable with not knowing everything all at once, and that these important pieces of syntax will start to make sense in future chapters as more concepts are revealed.

And it works like: 1a, 1b, 1c, 2a, 2b, 2a, 2b, 2a, 2b, 2a, 2b, 2a, 2b, 2a, 2b …
So for the next exercise I just added the {} as shown in the book. The error window indicated that it was necessary to have both of these commands... it begins to make a little bit more sense.
So I moved background to setup but nothing happened:

As I replaced the x and y position with the commands mouseX and mouseY I was able to move the body of the corona. Yeay!

So what is draw ()?
Processing solves this problem by updating the window only at the end of every cycle through draw( ). It is as if there were an invisible line of code that renders the window at the end of the draw( ) function.
Then I understood how we can move all the elements with the mouseX+ or mouseX- command. I tried that on the corona virus, I did not write the code for every arm, because I already understood how.

In addition to mouseX and mouseY, you can also use pmouseX and pmouseY . These two keywords stand for the “previous” mouseX and mouseY locations, that is, where the mouse was the last time we cycled through draw( ) .

3.4 Mouse Clicks and Key Presses
These are the two new functions we need: • mousePressed( ) —Handles mouse clicks. • keyPressed( ) —Handles key presses.
And last but not least, I was able to change the color of the corona virus' body determined by the mouse location. I decided to adapt all of the values of the little dots in order to see the better the en result.
The End of this lesson:
It was very difficult for me to understand a lot of things. I am NOT a number person, so I feel very overwhelmed when I see so many codes and numbers. I had to read a couple of things twice and the videos on the processing website were definetely helpful. I was able to do every exercise on the chapter. I think the best way to learn processing is actually by just trying! Once thing started to work I got a sense of accomplishment. I am excited and at the same time, scared to learn more in the next lesson.


Comments